With Windows 10 version 1903 (May 2019 Update), Microsoft is forcing users to opt for an online-only account during the setup process. Many users have reported that the option for a local account is no longer available. After the forced Windows update fiasco, this is Microsoft’s latest push to bring more Windows users online. Microsoft suggests that having an online account brings additional features like OneDrive storage, password sharing, files and setting syncing, and more. However, there have been several controversies around its background telemetry services so I would always prefer a local account. Thankfully, there is a way out and I am going to show you how to create a local account on Windows 10 during setup. The steps are quite easy so no worries on that front. Now let’s jump right in without any delay.
The key is to not provide internet access to the PC so that it will be forced to offer an option for a local account. Here is how you can circumvent Microsoft’s online setup process.
1. If you are using an Ethernet connection, make sure to unplug it from your computer before setting up Windows 10.
2. If you are using WiFi and have already connected your PC to an access point then either turn off your router for a while or restart your PC and click on “Skip” in the Network window.
3. Now comes the crucial part. After you have disabled internet access, click on “Create Account”.
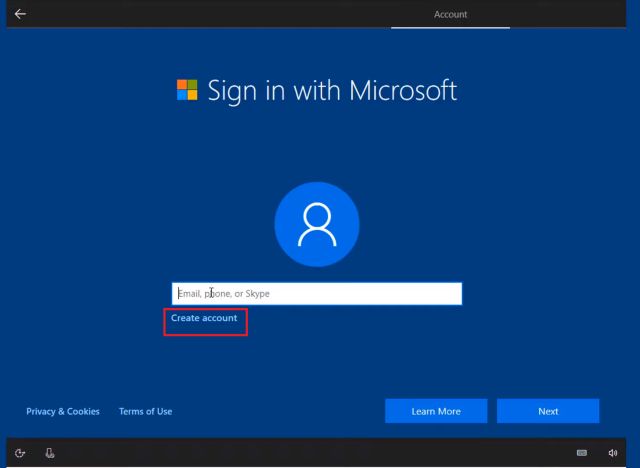
4. Upon failing to connect to a network, a “Skip” button will appear at the bottom. Click on it.
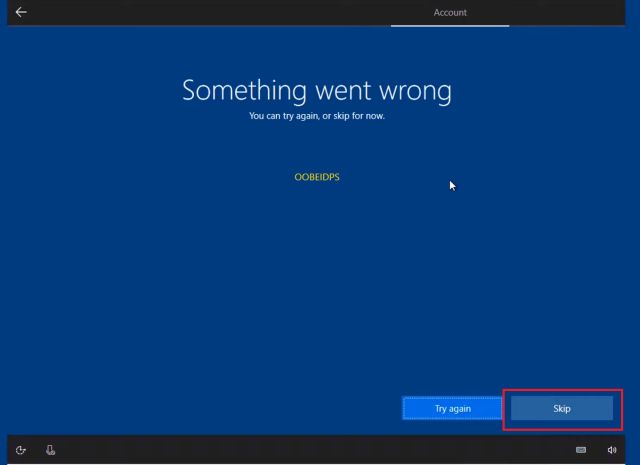
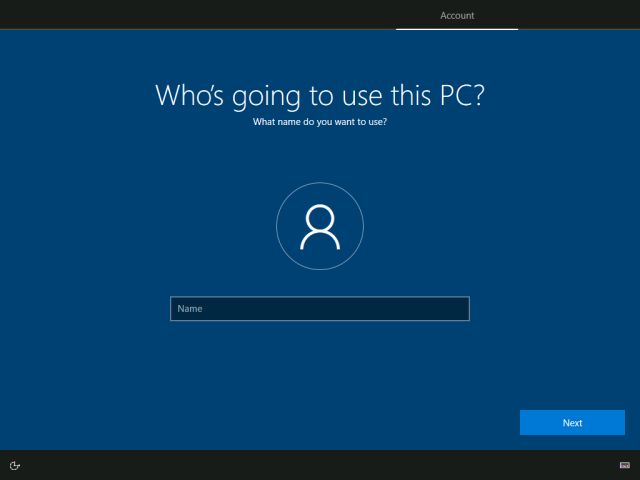
5. Now, provide a name for your PC and continue with the on-screen instructions just like you do for a local account. Well, that’s how you can create a local account on Windows 10 during the installation setup.
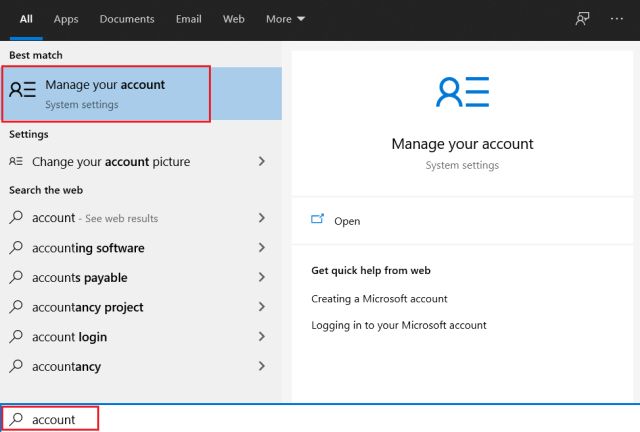
1. Press the Windows key once and type “account”. After that, click on the first result: “Manage your account”.
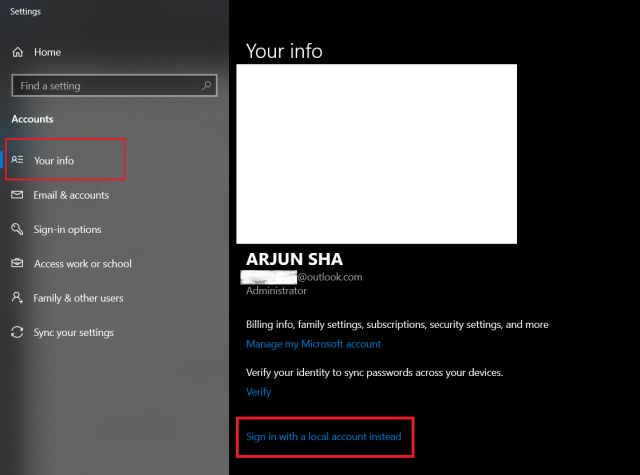
2. Here, click on “Sign in with a local account instead”. It will seek your confirmation again, just press on “Yes” and the online Microsoft account will be removed. After that, it will prompt you to set a password for your local account.
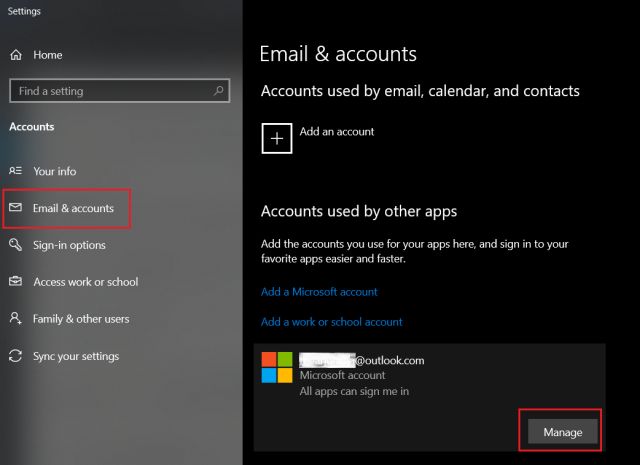
3. To make sure that the online account is completely removed, move to the “Email and accounts” tab and click on the connected account. Next, click on “Manage” and remove the Microsoft email account from your PC. You have successfully moved to a local account on Windows 10.
- Hitarth Langaliya
Create a Local Account on Windows 10 During Setup
1. If you are using an Ethernet connection, make sure to unplug it from your computer before setting up Windows 10.
2. If you are using WiFi and have already connected your PC to an access point then either turn off your router for a while or restart your PC and click on “Skip” in the Network window.
3. Now comes the crucial part. After you have disabled internet access, click on “Create Account”.

4. Upon failing to connect to a network, a “Skip” button will appear at the bottom. Click on it.

5. Now, provide a name for your PC and continue with the on-screen instructions just like you do for a local account. Well, that’s how you can create a local account on Windows 10 during the installation setup.

Switch to a Local Account on Windows 10 After Setup
In case, you have already signed in with a Microsoft account, you can easily switch back to a local account. This will ensure your data remains on your computer locally and is not used for user tracking or ad targeting. Here is how to go about it.1. Press the Windows key once and type “account”. After that, click on the first result: “Manage your account”.

2. Here, click on “Sign in with a local account instead”. It will seek your confirmation again, just press on “Yes” and the online Microsoft account will be removed. After that, it will prompt you to set a password for your local account.

3. To make sure that the online account is completely removed, move to the “Email and accounts” tab and click on the connected account. Next, click on “Manage” and remove the Microsoft email account from your PC. You have successfully moved to a local account on Windows 10.

Create a Windows 10 Local Account and Protect Your Privacy
So that was our short article on how to circumvent Microsoft’s latest push to use an online-only account. While Microsoft as a software company wants to deliver a better Windows experience using consumer data, the huge amount of data harvesting in the background makes one wary of privacy and user tracking. Anyway, if you want to use a local account on Windows 10 there is still a way out and thankfully, the steps are quite easy. In case, you are facing any problem while switching to a local account, do comment below and let us know. We will surely take a look at your issue.- Hitarth Langaliya


No comments:
Post a Comment